Tuesday, June 6, 2017

Top Tips to Ensure Baby’s Safety When Sleeping

Top Tips to Ensure Baby's Safety When Sleeping

Another milestone has been achieved when your little starts to roll over from side to side. And it's adorable to see just how much your little one can move around the crib once they start learning how to roll over. Okay, so rolling over kind of sounds like what something our dogs would do but once your baby starts to roll over, it becomes an entire scrapbook page dedicated to the first time your little one learned how to roll over.

You see, it may be a physical development that your little one was able to figure out doing but the reality is that it is something that we also need to adjust to. Parents who stay at home and dedicate their time for their kids are admirable because they can constantly have the time and access to keep checking on their little one as they sleep. But there are new adjustments that both parents who balance both work and family life and stay at home parents —safety. Once out little tot knows how to roll over from side to side, it won't be a surprise if your little one can get into an accident.

There are many factors that may affect your child's sleep safety and in order to sleep safely, we are going to talk about how to keep your baby sleep safely? What are our roles in keeping our child's safety in sleep? We have so many things to talk about and let us begin by taking a lot of considerations in putting your child to sleep.

Where should we put our babies to sleep?

There are so many choices in the market that your baby can sleep in; we just can't see to buy them all especially if we have a small space at home. We have plenty of choices from cribs to convertible cribs, bouncers or rocking bassinets, travel cots or play mats. There are so many choices that it's difficult to weigh in the pros and cons. So, why don't we?

baby sleeping in crib

• Cribs and Convertible Cribs

Well, this is actually the most common idea of parents when we buy our little one a special place where they can sleep. It is wide enough to accommodate your baby all the way from when they were born all the way to when they turn two.

  • Pros: Cribs are spacious. You can buy cribs in a set with a diaper changing area, a rocking bassinet and an area where they can simply rest nice and easy. This is also a fixed bed that allows your baby to sleep undisturbed. You can hang crib mobiles on top to keep your child preoccupied as well. Actually, you can just let your child play in the crib as well. Convertible cribs are cribs that can transition to a big kid's bed. It saves money in buying a bed after your baby outgrows the crib.
  • Cons: It is pretty pricey. It takes up a huge space. Some cribs have very high railings that once you put your baby to sleep you have a hard time transferring them down to the crib to sleep. It is heavy and it is not portable. It is meant only to be in a fixed area designated for your child to sleep and play in.
  • NOTE: It is relatively safe sleeping for the baby b ecause a designated area for your child to sleep in allows lesser hazards like objects that might fall on your little one.

• Bouncers

They are small chairs that rock your child. It is meant to be a portable entertainment and sleeping center for your child.

  • Pros: They can be brought anywhere around with you. You can let your child sleep in it as well while you do your things and still have a constant eye on your little one. We know you can be busy and you don't want to keep running to the nursery just to check on your baby. It also promotes great muscle development for your baby. Once your little one outgrows the bouncer, it can be a nice rocking chair for your toddler.
  • Cons: It is only meant for newborns and infants. Once your child outgrows the bouncer it has to be discarded or stored until your child learns how to sit on a chair in good behavior.
  • NOTE: It is a safe sleeping for newborns because they barely move at all. When they are able to shake their hands and start kicking it allows the baby to rock the bouncer. However, it is not safe for your newborn to sleep in it or even stay in it for more than 20 minutes. It can cause flat head known as plagiocephaly in babies.

• Rocking Bassinets

Bassinets are way older than we think, they were initially made for newborns to sleep safe in. In fact, it also has a similar counterpart called the Moses basket. It is a comfortable basketlike cot made for the purpose of sleeping safely for baby.

  • Pros: Newborns and infants are perfect for bassinets; it is more portable than cribs and much easier to deal with than other sleeping areas. It is comfortable and safe for your baby to sleep in. in fact, it promotes better sleep for newborns and infants.
  • Cons: It is only meant for babies who do not know how to roll over. Once your baby learns how to roll over and sit down, the bassinet turns into a hand-me-down and the Moses basket becomes a laundry basket.
  • NOTE: With regard to safety, many parents have the concern of the rocking frame and the bassinet or Moses basket to fit in properly. Some frames can topple over compromising the overall safety of your baby. It is also not recommended for babies who can roll over because when they start rolling over, weight distribution changes which may also make the bassinet or basket to flip and fall.
baby sleeping

Sleeping Essentials: Do our babies really need them?

Aside from the list of sleeping areas where our babies can rest in, we have one baby essential that we recommend you to have: swaddle blankets. Swaddle blankets are great for your infants to sleep in, it promotes better sleep and deeper rest allowing your infant to be less grumpy, however, they should only be used as sleeping essentials during the daytime as they may get weary of being swaddled in a tight blanket through the night.

What underlying dangers are there when our child is sleeping?

There are plenty of danger hazards that can endanger your child. If we are not careful, our child might choke from loose blankets, comforters, and other strings nearby; be squashed by heavy objects; be injured by objects that might fall on them; and even, electrical wiring if night lights or baby wipe warmer sockets are not properly positioned well.

How to promote a baby's safe sleeping environment?

For infant’s safety:

  • Make sure you cover your infant with a blanket only until the chest with both arms sticking out. This allows your infant to move their hands freely and also significantly reduces SIDS.
  • Use only a firm foam. Firm foams don't bend twist and sink. Using water beds, comforters, blankets over blankets and microbead sleeping areas are potentially dangerous. If your child sinks to one side and has their breathing compromised it is an extreme NO-NO for you to use these. Plus, a firm foam also promotes stronger bone and muscle development.
  • Don't use oversized pillows, bumpers, comforters, plushies and toys surrounding your infant. Your baby can't turn or roll yet so no need for these excess things. They are choking hazards for your little one. You only need a fitted sheet over the foam for a more relaxed and safe sleeping space.
  • Use snug clothing. Don't let your infant or baby sleep in clothes that can easily come loose and cover their faces. Snug clothing are fine, as long as they are warm and comfortable your child doesn't need excess baggage in having a good night's rest. You can also let them use wearable blankets as well.
  • Let your baby sleep on their back. That's how it is actually. If you are afraid that your baby will have a flat head, don't! You can actually turn your baby's head from one side to the other but still letting your little one sleep on their backs.

For baby:

  • Bumpers. Once your baby starts to roll over or have more advanced motor skills, they are also less likely to choke since they can already move out of their way to breathe better. You can start using bumpers to prevent them from hitting the crib frames and their surroundings. Make sure that the bumpers can be tied for security.
  • Firm Pillows. Although your baby can already move, you can only let your child use a firm or a thin soft pillow. Soft pillows are still choking hazards.
  • Thin comforters. Once your baby grows a bit older, you can add thinner comforters. Thick comforters are still choking hazards too.
  • No to oversized heavy hanging objects. Don't use crib mobiles that are heavy and have too many things on them. We recommend that you use crib mobiles with soft plushies on them and not plastic toys.

Co-sleeping: Is it a Go-Go or a No-Go?

Experts say that having a separate room for your baby is actually not a conducive environment for you and your baby. Baby safe sleep happens better with co-sleeping but it is recommended by most experts to co-sleep when your baby is 6 months and more—before that, they recommend safer sleeping in a bassinet in your room. Co-sleeping has an advantage, it allows you and your baby to have skin-to-skin contact and better sleeping is induced in co-sleeping, BUT! There are big but's in co-sleeping like:

cosleeping
  • Deep sleeper. If you are such a deep sleeper that you can sleep through an earthquake, don't let your baby sleep beside you. You are less aware of your environment that you might compromise your baby's breathing.
  • The rolling pin sleeper. If you are the type of sleeper that keeps moving from left and right, then co-sleeping is not for you. You might end up rolling over your baby like a cookie dough.
  • Small bed. A small bed that you and your hubby share is not enough space to add a baby in. If you have a bigger bed to sleep in, there is more space for you, your hubby and your baby to move in.
  • Water bed, Soft bed, and Oversized Pillows. If you love all these things, don't ever let your baby sleep beside you. These are all choking hazards that can definitely pose a great danger to your baby's safe sleeping.

RECOMMENDATION: Here at ParentsNeed, we care so much about you and your baby's welfare. Your baby's safe sleeping is our priority so we recommend that you get a co-sleeper. It allows you and your hubby to have good night's rest without running to the nursery. It also provides a better view and promotes intimate sleeping with your baby. Breastfeeding is also not a problem and putting your baby right beside you like a bedside table allows you to reach and check in on your little one.

If you do not have a co-sleeper or lack the space for one, you can get a firm foam and put it between you and your husband. A firm foam can define a space for your baby to sleep in and it allows you to have easier night time feedings with your baby. And both you and your little on can easily drift back off to sleep.​

SIDS: A Parent’s Nightmare

SIDS or Sudden Infant Death Syndrome is linked to so many things and one of the culprits is co-sleeping with your newborn. It is also linked to many other factors like improper sleeping positions that can compromise your baby's breathing. Another factor that causes SIDS is overheating. It is less known to many that your baby can overheat, letting them wear breathable cotton clothing and gentle blankets allow comfortable sleeping. Wrapping them up in too many blankets can also cause overheating. Babies naturally have higher basal body temperature and making them overheat with layers after layers of clothing and blankets increases the risk of SIDS.

Baby Safe Sleeping Position: Is there a safe position for baby to sleep on?

SIDS has been said to be a direct result of improper sleeping positions for your baby. Babies should be sleeping on their backs on their first year. It allows better breathing and a more comfortable position for your baby to rest easily. It is the best sleeping position for the baby after feeding. Even if your kids prefer to sleep on the side, as long as they have mastered the art of rolling over then you are fine. Just make sure that they have a baby safe sleep environment.

SIDS is a very unfortunate event. It is not an illness that other babies can catch. It is a mere unfortunate accident that leads to the death of a healthy baby. Many families have suffered due to SIDS and one of the best ways of preventing it is being careful in your baby's first four months. Once you are through this using the tips we have given, then you can get in bed with your little one with lesser and lesser risk as days pass into weeks and weeks into months until your child is ready for their big kid's bed.​

The post Top Tips to Ensure Baby’s Safety When Sleeping appeared first on ParentsNeed.

How to Disinfect Toys Properly

How to Disinfect Toys Properly

Cleaning is one of the things we are so meticulous with especially when we have a new member of the family join the house—our baby. Cleaning has evolved to an entire equipment of germ busters because the reality is; our babies have absolutely no inkling of what germs are. So, from chewy rubber from mucky dirt from the backyard, our babies' taste buds seem to have no limit as to what they can tolerate. Kids can put everything they touch into their mouths and they can even start chewing and nibbling on things on the wall and on the ground.

It may be disgusting for us but that's all natural for our babies to do. Technically, it's their job to explore and if we don't watch out, their mouths have already begun the entire journey of the household corner, gunk, muck and dirt. Their exploration allows them to learn new things and also allows them to understand things depending on the taste, the texture and also the smell along with other info that they might need to gather.

Cleaning the environment

First off, we need to clean our surroundings right? We have to prepare a place where your child can go around and play in. With an are in mind, secure the area with baby gates: retractable gates, freestanding baby gates or hands-free baby gates. Baby gates can set a play are for your kids and their playmates and even your pets. It is also a great way of securing them and keeping them away from dangerous objects around the house.

Start from top to bottom, clean the grills, the nooks and crannies and other hard to reach places. Your baby's tiny hands can practically reach into tiny crevices and can really surprise us as to how curious our babies can be. You might as well partner up with your handheld vacuum cleaner to do the job much faster.

Once you are done with the dusting and the removing of all the tiny things that your little one can probably swallow, disinfect the flooring before you lay down a play mat or carpet. Some parents mop the floor with a few drops of bleach to disinfect the floor. However, bleach is a very strong chemical that can make our children ill. It is primarily a dangerous chemical when ingested as well. That's why we like using steam mops. It's clean and chemical-free and it does the job of great disinfecting too without the use of chemicals.

How to Disinfect Toys Properly

Your Baby and Germs

When you watch national geographic and find kids in isolated villages chewing on soil and going in the rain forest and barely find them being ill. According to experts, babies actually get more immune to germs the more that they are exposed to them. It's like saying, once you catch chickenpox; your child is immune to it and won't catch it anymore. That's practically the same principle, experts say about babies and germs.

The thing is, it doesn't apply to all germs. There are dangerous bacteria that lurk around the house and the most common bacteria is something that is called E Coli. It is actually the bacteria that give us a horrible case of diarrhea.​

Everything in your house carries germs. Some help boosts the immune system and a common few causes illness. And for that reason, we need to know how to disinfect baby toys the proper way. Most parents rely on the magic of bleach but it is just as potentially dangerous to our kids as well.​

What lurks around the environment?

There are things that we should be very careful of when our kids play with their toys. Our babies love putting things into their mouth and this can go on all the way up to four years old. Some children stop putting things in their mouths at around two but it's still common to find toddlers taking in the habit of putting things into their mouths. One of the reasons why we need to disinfect toys are because of the following:

  • Molds. Toys with holes and spaces and tiny cracks are potential mold breeders that can harm our kids. Molds are extremely dangerous. These black molds often target the respiratory system. And they love wet and warm places like the inside of your baby's toys. When your child slobbers all over their toys like a chew toy or a teether, warm drool finds its way inside and stay inside. This is the perfect place for molds to breed in.
  • Bacteria. Bacteria are found everywhere. They can cause diarrhea, cholera, infections and food poisoning, pneumonia, UTI, and much more, these are only the common illnesses that bacteria can bring.
  • Virus. A virus is more contagious that bacteria. They breed faster and travel faster from one person to another. Technically, babies can't really infect adults with illnesses but adults can definitely infect babies. If a few droplets of your cough got into our kid's toys sanitizing baby toys must be done immediately. This should be done when one heals from common colds, flu, viral infections, rubella and some such.
  • Bugs. Just we don't see them doesn't mean they are there. Creepy crawlies are everywhere even in our kid's toys. Of you fail to clean your kid's toys up, roaches will end up laying their eggs in nooks inside your kid's toys. Bugs have some defense mechanism. They produce some chemicals to repel predators and these chemicals as well as the bugs themselves can make your child ill.
  • Nasties. There are many nasties that lurk in dirty places. And you know what they are. So, start sterilizing baby toys!

How to clean baby toys traditionally?

The most traditional way of cleaning toys—hard toys—starts with washing them. After being washed, we usually put them in a steamer and steam it for 15 minutes to disinfect baby toys. After that, we dry them on a drying rack. But this doesn't apply to everyone. It can be tedious and it can also be one by dishwashers. So homes without dishwashers can do this at home.

How to disinfect toys via machine washing?

Always read the washing instructions and do as they say! Clean baby toys first by segregating which toys can be machine washed and what can't. So here is a list of things that cannot be machine washed:

  • Toys with electrical wiring
  • Toys that are over 18 inches long and or wide
  • Toys with microfiber fill
  • Toys that have paper or plastic stiffeners.
  • Toys with a lot of accessories that can also damage the washing machine.

REMEMBER: When machine washing toys, we recommend that you try stuffing funky-smelling toys inside a paper bag with baking soda. Shake the bag until the baking soda has covered the toy all over. Then, let it sit for 30 minutes. This will remove the stench and you can go ahead and machine-wash the toy.

How to clean soft toys or plushies?

Machine washing is the easiest solution to washing your baby's plushies. They are dust hoarders and they need to be cleaned at least once a month. But, if your child loves to bite and nibble on stuffed toys, then wash them as soon as they are slobbered on. Here is how we clean stuffed toys the ParentsNeed way:

  1. Bring it outside under the sun and start hitting it with a stick. Most of the dust will fly out.
  2. Wipe the surface with a damp cloth to remove more of the dust that clung on.
  3. Give your baby’s soft toy a bath! Off to the washing machine they go!

How to disinfect toys with ammonia?

If your little one doesn't often play with the stuffed animal, you can spot check the toy after vacuuming it. If there are spots all over the toy, mix ¼ teaspoon of ammonia with a ¾ tablespoon of dish washing soap and 3 quarters cup of water. Whisk the solution up until it froths up. Grab some of the froth and apply it on the spots. Leave it for 5-10 minutes and wipe with a damp cloth.

If you are a bit reluctant to use ammonia you can mix ½ cup of alcohol, ¼ cup of water, and ½ teaspoon of dishwashing liquid. Whisk it up and do the same with the ammonia mix.

How to Disinfect Toys Properly

How to clean small plastic toys?

This is probably the simplest baby toys to clean. You can clean them by tossing them into the dishwasher. We recommend that you take them apart so that the dishwasher can clean it more thoroughly. A dishwasher can already clean and sanitize baby toys. But, toys fade and lose its luster, you can use the cleaning methods in cleaning and sterilizing baby toys. We recommend that silicone toys only be washed because they are pretty resilient.

Small plastic toys can also be soaked in a small bucket of water with two tablespoonfuls of bleach. Your baby probably has some rubber squeaky toys laying around. They are one of the breeding grounds of molds because our kids love to chew them up and they make squeaky sounds when they do. But, if you cut one open, you will find a horrific image of moldy toys. So, one tip to remember! If in doubt just trash it out!​

How to clean wool toys?

Wool is pretty difficult to toss in the washing machine. They are pretty delicate so it needs the proper attention for cleaning. So, if you want to clean it well, you put the wool plushies inside a pillowcase or a net bag and toss it in the washing machine. You can also spot clean the wool, we've already discussed how to do that above.

Toys aren't meant to last, your kids eventually get tired of their toys after a week. That's why we recommend you to do a toy rotation. This allows you to clean and sanitize toys one set at a time and store. It also helps your child regain interest in a new set of toys. It also saves a lot of money since you don't need to give some out and buy some again because your little one got tired of it.

How to clean soft toys without washing?

If you clean baby toys every week—especially soft toys—it ensures a cleaner set of toys. Every time you vacuum the floor, you can include your little one's soft toys one at a time. Vacuuming it removes the dust and dirt particles that are contaminating your child's toys.

Dusting and brushing soft toys frequently prevents dust from sticking to the toys. Get a duster and an old toothbrush. Actually, here is a fun tip to involve your child in doing household chores. Grab your little one's old toothbrush or probably your electric toothbrush that you have already discarded. Teach your kids to brush the furry and fuzzy toys on the porch or in a well-ventilated area. One of the things that they find fun is when we cover their mouths and noses with tied bandanas and go under the sunlight and let the electric toothbrush run on their toys. The dust particles start flying under the sun and you can play a game with your little one while actually having them do their own toy cleaning.

How to clean baby toys that have batteries?

One dilemma of parents in cleaning out some toys are because they are electronic. They come with batteries or they are rechargeable. Some toys have removable battery canisters to avoid them from getting wet or damaged. And then you can do the usual cleaning. If the battery doesn't come out, you can also spot clean baby toys it or find out how to clean toys with vinegar. Let us show you how:

How to Disinfect Toys Properly

Mix one part water and one part vinegar in a spray bottle. Spray a clean cloth with your solution and start wiping your baby toys. Just let it dry under the sun or in a warm dry spot and your child is ready to play with their newly sanitized toys again.​

Vinegar is a natural disinfectant as well. It has acetic acid that is very effective in cleaning out general items. It is actually a miracle cleaner. It is natural and it is very effective in keeping our things nice and neat. Don't worry about the smell since it goes away when it dries up. You can also clean vinegar with so many things like cloth, metal, wood, tiles and any surfaces.

How to sanitize toys without bleach?

Hydrogen peroxide is known to be a very effective way to sanitize baby toys and other household products. So, how to clean baby toys with Hydrogen Peroxide? This method is becoming increasingly popular but you can clean baby toys with one part water and one part Hydrogen Peroxide. You can use it in a spray bottle and start cleaning out the toys—but this spray bottle can only last for 24 hours. You can also soak the toys in the mixture until the bubbles go away. Let it dry under the sun or in a warm and dry place.

How to keep your toys clean?

Simple! Keep toys in its special area. This will also teach your children some good habits at home. Let them fix their toys after playtime and keep those toys inside toy storage boxes.

Never mix toys with other household items. Don't put toys together with dangerous chemicals or other items that can be dangerous for your child. Always let your children play with their toys only in designated areas. Don't let them get out of their playpens but rather let them have fun in their own playing spaces.​

In Summary...

Disinfecting toys provides a safer environment for your little one. And with so many ways of disinfecting baby toys that don't require strong chemicals, you are sure that your little tot's toys are clean and free of dangerous chemicals. So, have fun with your child in safely cleaning baby toys and playing with cleaner toys in a clean environment.

The post How to Disinfect Toys Properly appeared first on ParentsNeed.
When do Babies Learn to Roll Over?

When do Babies Learn to Roll Over?

We know how it feels like to be a new mom. We've all been there and the many worries and excitements you have for your baby are more than normal. Actually, it's more like an obligation, right? Anyway, there are so many things to watch out for once we give birth to our baby. One of the baby milestones to watch out for was their eyesight. Then, our baby starts to carry their head by looking from left to right. Then, our baby learns to recognize who is the mommy, who is the daddy and who is a total stranger—then cry! And in this new chapter of our baby's life, we are going to talk about babies rolling over early or late or just right as expected.

Your baby's first year is the year you are so excited about. It is the year of firsts! First laugh, first reach, first roll, first crawl and so many endless lists of firsts that your camera and scrapbook won't be able to cover at all. So, to new parents who still don't know about the basics of your baby rolling over, we're going to talk everything about it that you didn't even know you needed.

When do babies start to roll over?

On average, babies start to roll over about 5 to 6 month of age. There are reports of babies rolled over at 3 weeks, well, it can happen and there is a big possibility that it can happen to other babies but it doesn't apply to all. Babies start developing strength on their neck muscles, their arms and their backs first before rolling over. And when do babies begin to hold their head up? Babies hold their head up at 3 weeks or 3 months at most and that's a sign that says that his/ her neck muscles are getting stronger.

Babies eventually learn how to roll over, and letting them do it at their own pace is just the right direction to go. Don't be over too sensitive about it when your friend's babies learned how to roll earlier than your little one don't also feel bad when your 6-month-old still hasn't learned how to roll over. Give your baby time. Do all babies learn how to roll over? Yes! So be patient, mommy! Your baby will get there soon enough.

Which way do babies learn to roll over first?

You may have heard about two steps in rolling over the belly-to-back rolling and the back-to-belly rolling. Babies start rolling from belly-to-back first. It is much easier for our babies to do that because our babies' arms can push them to roll over to one side. This is a key start actually. You may notice that your tot can do this once you let him/ her stay on the belly. You can start doing that by the time your baby can lift his/ her head up.

When do Babies Learn to Roll Over

The back-to-belly rolling comes a bit later than that. This is when the 5 to the 6-month time frame is usually expected. Babies—by that time—develop stronger control of their arms and legs and muscles to propel them to roll over from their back to their belly. After this stage, give it a week or two and your little one is rolling like a ball around the crib.

There are some babies who seem to roll only from right to left. Don't worry. Your little one will eventually learn how to roll in both directions. It's just that your tot finds it easier to roll over to this certain side. It's nothing to worry about really because babies differ from each other and getting your tot to roll over from one side to another doesn't have a due date.

How to help your baby to roll over?

Helping your child achieve one of his/ her physical milestones is not that difficult. You can actually encourage your little one to roll over. But there are many ways of doing it directly and indirectly.

• Healthy pregnancy routine

A healthy nutrition during pregnancy plays a huge role in your baby's health when he/she is born. Your baby's bones start to develop all throughout the entire pregnancy especially the second trimester that's why every trimester, your Ob-Gyn gives your different supplements depending on the growth and development of your baby.

• Stronger bones, earlier rolling

Remember when you just got out of the hospital and you were given some calcium supplements? Well, if you are breastfeeding, those supplements will also fulfill the needs of your baby's muscle growth. You both need plenty of calcium. It is for you to recover from the trauma of giving birth and to help your boys go back to where it should. And for your baby to develop stronger bones since babies have really soft and tender bones.

Breastfeeding your little one is one indirect way of helping them build muscle control making a baby rolling from back to tummy at 3 months. As you take a high calcium diet, it also passes on to your little tot. So, having calcium rich food and not just being dependent on supplements will help your baby a lot.​

Calcium in our milk is actually lower than formula milk. That's because our breastmilk calcium is much easier to digest and absorb than formula milk. Formula milk has more calcium—and also iron—because less of it is absorbed by your baby's body. This helps build strength so your baby rolls at 5 months as expected.​

• Pillow roll

Once your baby starts to lift their head up, you can help them exercise that milestone by putting them on a low rise pillow on their tummy. Your baby learns to lift his/ her head and starts to move it from left to right to find a more comfortable position. Doing this about 5 minutes at a time will help encourage your baby to start pushing with their arms against the pillow or move their neck and shoulders to one side.

Awake time is playtime and by 4 months, you can have your baby do a lot of tummy time. Once your baby can lift himself/ herself up with both hands against the pillow, you can remove the pillow. Just let your tot have his/her tummy time and eventually he/she will start pushing and turning. Belly-to-back is done and accomplished!​

• Extended Arms and Crossed Legs

Once your tot has mastered the belly-to-back roll, it is about time your tot also learns how to roll from back-to-belly. One of the tricks we came to learn from experts—meaning other mommies from ParentsNeed HQ —is by letting your little one lay on one side but extend the other hand out. Let the legs stay together on one side. This encourages your little one to roll over towards the extended arm then your baby rolls over and the legs will follow.

We also have a similar trick but using that old total body pregnancy pillow you have stored around. Lay your baby on the pillow with either the left arm and left leg or right and right leg extended out and the other tucked under your baby. Your little one will start rolling over to the side of the extended limbs.​

A simpler way of helping your baby roll over is just by letting them lie on their backs and hold their hands and gently pull to a sitting position. This is actually a good way of strengthening the core muscles of your little one.​

REMEMBER: Don't rush your baby. Let your little one master the art of lifting their head, and moving and shaking their arms and legs before you start doing dome tummy time and playtime exercises!​

When do Babies Learn to Roll Over

• Encourage tummy time

And most moms and experts swear by this one. It doesn't take much and need nothing, you only need to put your child in a safe environment and put them belly down. Tummy time is the mother of all baby rolling exercises. It targets the core muscles and also strengthens the limbs. When you encourage more tummy time—but not too long that your child will get tired and fussy over it—your child develops more bone and muscle control. They will start to realize that, 'hey, I can do this!' and begin to experiment on their own and your baby turns over.

Tummy time over any surface is okay but we suggest you use a firmer area like a cloth over the floor, a clean carpet, a play mat or any flat and firm surface this will help your baby roll over faster. Putting your child on a soft bed during tummy time doesn't help, your baby will have a hard time moving if they try to push themselves up and find themselves trapped with the utter softness of your cotton comforters. They will also have a hard time moving from left to right of the bed sinks underneath them.

That's actually one reason why most experts say that letting your baby sleep in a firmer foam is more bone and muscle development friendly than having them lay on extremely soft surfaces. Baby’s bones are delicate and soft and letting them lay on extremely cushiony materials proves to be more troublesome when it comes to advanced physical development.​

What to watch out for?

When your baby starts to roll over, who knows which side or which way your baby rolls. When they get to go around the crib rolling here and there then your need to make sure that his/ her rolling environment is very safe. Keeping your child' surroundings clean and free from free falling objects nearby is a must. You have to make sure that the bumpers are secured—or better yet, tied to the crib.

Keep light blankets around your baby and remove anything that poses a choking hazard. It is better to lay your child on ground level over a play mat or in convertible cribs. Putting them on ground level or in an enclosed area prevents them from rolling off the bed or the crib.

We do recommend you to put your little tot on the ground over some play mats. They get more exercise that way, your baby rolling over here and there. It also encourages them to start sitting up on their own and also to lift their body up and crawl. It is much more effective you just let your child have as much freedom to do as they want and when they want—of course, it has to be childproofed.​

What not to worry about?

One of the biggest worries we have as parents is when we notice that our baby seems to have come late in rolling over. Well, DON'T! It's not the end of the world when your baby is late in learning how to roll over. Just because it is expected for most babies to roll over at a certain age doesn't mean your baby should do it at that time too. Development differs from one baby to another and the stages don't really have a due date, so don't worry. You can encourage your baby to roll but don't make that common mistake of new parents where they easily get frustrated or anxious over everything.

At this stage, your baby has already overcome the SIDS peak stage. Congratulations! But don't also worry about your baby rolling over their tummy preventing them from breathing properly. Babies have strong instincts; their bodies can already tell which position allows them to breathe better and when they can't. Don't worry if your baby kicks the blanket off the way or is rolling all over the crib. Just make sure that no object nearby will fall over your little one. If you think that it is too cold for your baby to sleep properly then let them wear a wearable blanket.

What's the next step for baby?

What happens next after your baby starts to roll over? A lot! Seriously! Once your baby learns how to roll over it’s only a matter of time before they start sitting up unsupported. Actually, some babies develop these two milestones altogether. But sitting up on their own comes after these two.

So after sitting up, you need to start baby proofing your home and get your child a freestanding baby gate. Your little one is ready to crawl and wreck fun and havoc around your home. These are just too exciting so have your cameras ready and start capturing your baby's first moments!

The post When do Babies Learn to Roll Over? appeared first on ParentsNeed.

Monday, June 5, 2017

Best Bike Seats for Kids Buying Guide

Best Bike Seats for Kids Buying Guide

Biking is a wonderful activity with so many benefits. It gets you out for some healthy sun exposure and fresh air, it promotes fitness, and is good for your cardiovascular system. It gives you all that without harming the environment. As if that wasn’t enough, it is a real viable mode of transportation, too. For your kids, introducing cycling is a great way to get them outside for some healthy play. It helps them to get familiar with their immediate surroundings and keeps them engaged and active during travel. And experts agree that children who spend more time in outdoor activities are more confident, more independent, more social, and more creative. Who wouldn’t want that for their growing children?

So if you’re a bike lover, we completely understand why you would want to get your child into the habit of biking. The good news is that you won’t have to wait until your child can balance and pedal on his own bicycle. You can get him engaged and interested by letting him get on your bike as a passenger while he is as young as 9 to 12 months old. And one of the ways to do this is to take them on a bike ride with you on their very own bicycle seat and we have the low down on how to pick the best seat for your child.

Safety Regulations

To begin with, taking your child on your bike as a passenger carries with it a certain amount of risk. And while there aren’t so many reported incidents on toddlers riding bicycle seats, you will still want to have a look at safety regulations regarding these child restraining devices. In some parts of the world where biking is considered an option for commuting, child bike seats are regulated by the government. So you will want to look if the brand you are looking to buy has the seal of approval from the appropriate government department. They will also have guidelines as to what kinds of bike seats – such as front seat or rear seat – are allowed on the streets.

For example, giving children rides on adult bicycles is something more of a leisurely pursuit in the US so there is a limited number of approved seats, and almost all of them are rear mounted seats. This means that you will probably not find a front seat that has any sort of government seal on it. Whereas in the UK and parts of Europe, biking is a major means of transportation and so they have a wide variety of front and rear seats that have passed government regulation. If you know that there is no such regulation in your part of the world, then you can use your best judgement on whether you should let your child have a ride on your bike on a bicycle seat.

Type of Bike

If you decide that, yes, you want to take your little one with you on your bike, then you should have a look at your bicycle to check what kind of child seat can be mounted on its frame. For instance, if the top tube of your bicycle is under 51 centimeters you might have to forget about installing a front mounted child seat. This is because such a seat will probably take about 25 centimeters of space, leaving you very little room to bike comfortably.

On the other hand, rear seats have two mounting options. One is through a special mounting rack that attaches to your bike. This means that your bike needs to have mounting eyelets at the rear wheel in order to use the rack properly. Without those eyelets, you are better off using a frame mounted rear child seat.​

Front Mount vs Rear Mount

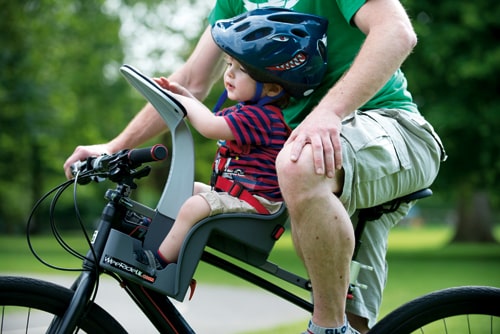
Once you have checked your ride for compatibility with a bike seat, you should decide if you are going to purchase a front mounted child bike seat or a rear mounted seat. There are advantages and disadvantages to both and your choice will depend on what you value most in moving around on a bike. On the one hand, front mounts are fun for little children because they get to see more things in front of them. And because they are seated in front of you, it is easier for them to turn around and talk to you if they feel that they need to. You might also like that you can see whatever they are doing as it is much easier for you to check on them during the ride. However, front mounted seats are not advisable if you have a bigger kid because their height might obstruct your view. Additionally, your front mount might cause you to pedal awkwardly with your knees angled too far out, causing sores and possible injury in the long run.

Best Bike Seats for Kids Buying Guide

On the other hand, rear mounts are safer in case of a bicycle accident because you can protect your child by breaking his fall. Being in front of your child also allows your body to be a wind shield to protect him from the cold, as well as a sleep roll should he fall asleep on the ride. If you have long legs, you will appreciate that with a rear mount you will be able to pedal and steer your bike unobstructed. This will allow you to bike a longer distance with your child before you get tired. But one disadvantage is that you will not be able to constantly look around to check on your child. So it may not be for you if you tend to worry a little bit too much.​

Size and Age of Child

Once you have decided on the kind of mount that you want, you will want to consider the size and age of your child. Most rear mounts will be able to seat a child up to 18kg but you might find a preschooler sized seat that can accommodate a child up to 30kg. It is generally not recommended to seat a child under 12 months old in a front mount because of the potential harm it could cause them even in a minor accident.

Safety Belt and Foot Straps

For babies and toddlers, pick a seat that has at least a 3-point harness to keep them securely in their seat. If you can find one with a 5-point harness, that’s even better. This is not something you want to compromise because little children tend to be squirm around in their seats and you certainly would not want them to slip out. Additionally, look for one with secure foot straps so that your little one’s feet won’t accidentally slip into the rear wheels. If you have a bigger child, such as a preschooler, who you can trust to ride safely behind you, then you can forgo these features and go for a simpler model.

High Back Rest

A high back rest isn’t as important for bigger children, but it is for toddlers and babies who tend to fall asleep during rides. You also want the seat to be high on either side to avoid your child falling off from the side. If you are getting a front mount, you might want to get one with a sleep roll as toddlers tend to slump forward when they fall asleep. This way, they have somewhere to put their hands and head so they can nap safely.

Weight of the Seat

Unless you have legs of steel you will have to pay attention to the weight of the seat itself. You want to make sure that it isn’t already too heavy for you before you put your child in it so that you can travel farther without expending too much additional energy. You also don’t want it to be too heavy for you at the rear that it affects your balance and your ability to pedal up or downhill.

Top 5 Best Bike Seats for Toddlers

Ease of Unmounting

More often than not, a child bike seat is a permanent mount on a bike in that you wouldn’t really need to constantly install and uninstall it. But if for any reason you would need the option of having a “removable” bike seat, then pick a model that can be quickly unmounted from your bicycle. These types of seats are usually called frame mounts because they attach to your bike’s frame as opposed to models that attach to a bike rack.

Warranty

A warranty is usually a mark of the manufacturer’s confidence in their product. Since we are dealing with the safety of your precious little one, you will want to have a look at the manufacturer’s guarantee. This also ensures that you will be able to have your seat exchanged in case you get an inferior product, although that should be unlikely.

Thumbs up from Experienced Family Bikers

One of the best resources for feedback on bike seats are those who already use them. You probably know people who are biking enthusiasts like yourself and they probably have gone out cycling with their babies as well. They should be happy to share their experiences with you and whether or not they are happy with their child bike seat.

Tips for Biking with Your Child

  • When you first install your child bike seat, have a feel for the bike’s new handling before you put your child in his seat. Practice with a heavy sack of produce on the bike seat to get used to the new balance, then start with your kid in a low traffic area and over a short distance.
  • Even if you are an experienced biker, there is simply no way to anticipate untoward incidents. Therefore, you want to practice safety first. So before you allow your child to go biking with you on his bike seat, make sure that he understands that he must wear his helmet and that the message is consistent. Never let him on his seat if he refuses to wear a helmet.
  • Purchase a strong twin kickstand for your bicycle so that you can seat your child securely on his mount even if you are alone. But never leave him alone and unattended in his bike seat.
  • You will be spending a lot of time under the sun so don’t neglect your baby’s delicate skin. Protect him from sunburn by applying some sunscreen on all exposed areas of his skin. Make sure that the sunscreen you use is appropriate for his age. Alternatively, dress him warmly for biking during the cold months. You will also want to moisturize his skin and lips to keep them from chapping. If your child will be riding in a front mount, you can purchase a wind shield to break the wind and keep him from getting too cold.
  • Before you start out on your adventure check again for anything that could get caught in the bike’s wheels. Check your child’s shoe laces, scarves, and any article of clothing that could dangle and get caught.

Our Recommendation

We are certain that your child will be delighted when he finds out that he is going out for a bicycle ride with you and we know that you won’t be able to contain your excitement at the prospect of sharing one of your passions with your kids. This is why we at ParentsNeed HQ sorted through and tested a whole lot of bike seats that could accommodate kids from 9 months and up until we could compile the Top 5 Best Bike seats for Preschool Aged Kids and the Top 5 Best Bike Seats for Toddlers. Each one of our picks promises great quality and a fun, safe ride. We simply love the simplicity of our top pick, the Bobike Junior Rear Child Seat. This slim and lightweight rack-mounted model could easily please the confident older child who doesn’t like his movements restricted while being your willing passenger. Even so, the basic, no-frills seat provides a safety harness for your peace of mind. For toddlers, we simply adore the WeeRide LTD Kangaroo Child Bike Seat. The cushy seat and sleep roll will make sure your baby enjoys a comfortable ride while staying safely tucked in.

Originally posted 2016-09-20 03:57:43.

The post Best Bike Seats for Kids Buying Guide appeared first on ParentsNeed.